How to Improve Espresso Crema at Home: The Ultimate Guide
Summary
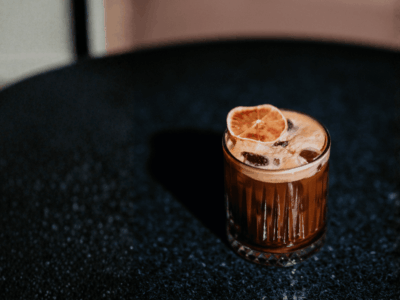
Crema is the true calling card of a great espresso shot. When you look at your cup, that velvety, hazelnut-colored layer on top sets the stage for the rich body and complex aromas you are about to enjoy. While pulling a flawless shot looks easy at your local coffee shop, replicating it at home can be challenging. Far too often, home baristas end up with an espresso with no crema, a watery liquid, or a thin foam that vanishes within seconds.
If you are wondering why your espresso machine is not producing crema, in most cases, the secret to a thick, perfect espresso crema comes down to small technical adjustments and bean selection. In this practical guide, we will break down the science behind the brew and show you how to improve espresso crema by mastering freshness, grind size, puck prep, and temperature.
Why is my espresso not producing crema? The science behind the foam
To fix the problem, we first need to answer a basic question: what exactly is crema? From a scientific perspective, crema is not just ordinary foam; it is a complex emulsion. During extraction, hot water is forced through finely ground coffee under high pressure (typically 9 to 15 bars). This process dissolves soluble coffee oils and traps carbon dioxide (CO₂) bubbles within the liquid.
When the espresso flows from the portafilter into the cup, the sudden drop in pressure causes the dissolved gases to expand, forming crema: a fine, stable foam rich in lipids and protein compounds. If the coffee contains insufficient CO₂, or if the resistance of the coffee bed is not properly balanced during extraction, this structure does not form correctly.
Understanding this mechanism is essential to identify and correct common issues related to both under-extraction and over-extraction.
How to improve espresso crema: 4 key factors to adjust today
Having a good machine is a great start, but technique and attention to detail are what truly elevate the shot. Here are the four critical pillars you can adjust right away to transform your espresso:
1. Check coffee bean freshness and storage
Freshly roasted coffee beans are packed with CO₂ gas. This gas is essential for building crema. If you use stale coffee, or beans that have been left open for weeks, much of this gas will have already escaped. The result is a flat, thin crema that disappears almost immediately.
Proper storage is just as important. Oxygen, light, and moisture are the main enemies of coffee oils and aromas. The best solution is to store whole beans in an airtight, opaque container, kept in a cool, dark place.
Avoid storing coffee in the refrigerator: temperature changes create condensation inside the container, which damages the oils and negatively affects extraction.
2. Dial in your grind size (the ultimate secret)
Grind size is one of the most critical factors in espresso preparation, often even more important than the machine itself. Particle size determines the resistance water encounters during extraction.
- If the grind is too coarse, water flows through the coffee too quickly, leading to under-extraction: the result is a watery, unbalanced espresso with a thin, unstable crema.
- If the grind is too fine, water struggles to pass through, resulting in over-extraction: the espresso becomes bitter, with burnt notes and a dark, uneven crema.
To achieve an optimal result, the grind size should be adjusted in small steps, aiming for a steady, consistent flow (often described as a “mouse tail” stream), with an ideal extraction time of around 25–30 seconds.
One often overlooked factor is grind freshness: pre-ground coffee quickly loses both aroma and CO₂. Grinding the beans just before extraction is one of the most important steps to maximize the quality of both the espresso and its crema.
3. Focus on puck preparation and even tamping
Once the grind size is correct, proper distribution and tamping become essential. One of the most common mistakes is uneven tamping, which creates areas of different density within the coffee puck.
When this happens, water under high pressure always follows the path of least resistance—a phenomenon known as channeling. As a result, water breaks through weaker areas of the puck, leaving the rest of the coffee under-extracted and compromising both balance and crema quality.
To prevent this, ensure the coffee is evenly distributed before tamping, using a distribution tool or gently tapping and leveling the portafilter. Then tamp with the tamper held perfectly level, applying firm and consistent pressure (around 30–40 lbs / 15–20 kg).
A level, well-compacted puck ensures even extraction and a more stable, persistent crema.
4. Monitor brewing temperature
Water temperature should remain within the ideal range of 195°F to 205°F (90°C to 96°C). If your machine has an unstable heating system, temperature fluctuations can significantly affect the quality of the extraction and the crema.
Water that is too cold lacks the energy needed to properly extract and emulsify coffee oils, resulting in a weak, pale crema. Water that is too hot, on the other hand, can scorch delicate compounds, damaging both flavor balance and foam structure.
It is also important to preheat both the portafilter and the cup. Pulling an espresso into a cold cup creates a thermal shock that quickly destabilizes the crema and reduces its overall persistence.
Arabica vs. Robusta: how bean variety alters the foam
Beyond technique, coffee genetics play a fundamental role. The two primary coffee species, Arabica and Robusta, behave very differently under pressure and have a direct impact on crema formation.
- Robusta beans: Robusta contains a higher level of caffeine and dissolved solids, along with a different balance of lipids and natural compounds. This composition leads to a particularly thick, dense, and long-lasting crema, typically with a more frothy structure and slightly larger bubbles.
- Arabica beans: Arabica is prized for its refined aromas and complex sugar profile, but it contains less caffeine and fewer natural gases. As a result, a 100% Arabica espresso tends to produce a thinner, silkier, and more compact crema, often characterized by elegant tiger striping with hazelnut and reddish tones.
If your main goal at home is to achieve a rich, visually impressive crema, the ideal choice is a high-quality espresso blend that includes a carefully balanced percentage of premium Robusta. This allows you to combine the aromatic complexity of Arabica with the body, intensity, and crema stability of Robusta.
Crema Troubleshooting Table: Fix your shot in seconds
| Crema Appearance | Likely Root Cause | How to fix it |
|---|---|---|
| Thin, watery, pale blonde, disappears quickly | Under-extraction. Grind size is too coarse, coffee is old/stale, or water temp is too low. | Adjust your grinder finer, use fresh beans with a clear roast date, and let your machine fully heat up. |
| Dark brown, burnt edges, streaks, or a hole in the center | Over-extraction. Grind is too fine, too much coffee in the basket, or water is too hot. | Click your grind size slightly coarser, reduce your dose weight, or run a cooling flush before brewing. |
| Large, soapy air bubbles on top | Channeling from uneven puck prep, or your beans are too fresh (excess gas). | Focus on flat, level tamping. If beans were roasted within 48 hours, let them degas for a few days. |
Achieving the perfect espresso crema is the result of a balance between chemistry, physics, and technique. With small adjustments to grind size, tamping, and coffee storage, noticeable improvements can often be achieved after just a few attempts.
If, despite applying these techniques, the result in the cup is still not satisfying, the decisive variable may lie in the raw material itself. Many commercial supermarket coffees do not offer the freshness and aromatic complexity required to develop a stable and consistent crema.
For this reason, coffee selection plays a crucial role: starting from fresh, carefully selected, and properly roasted blends can make the difference between a “good” espresso and a truly memorable one, even at home.